
![{"A?":"B","a":4,"b":1003200268,"c":"DADmChYRqhc","d":"PROD","A":[{"A?":"K","A":21.418795134702453,"B":16.44776119402985,"D":367.5,"C":65.2148782398053,"a":{"A":[{"A?":"B","A":12},{"A?":"A","A":"how to \n"}],"B":[{"A?":"A","A":{"color":{"B":"#000000"},"leading":{"B":"1200"},"tracking":{"B":"46"},"font-size":{"B":"17.266071805807044"},"text-align":{"B":"start"},"font-family":{"B":"YACgEaSMfJc,0"},"font-weight":{"B":"bold"}}},{"A?":"B","A":12},{"A?":"A","A":{"text-transform":{"B":"uppercase"}}},{"A?":"B","A":7},{"A?":"A","A":{"font-weight":{"A":"bold"}}},{"A?":"B","A":1},{"A?":"A","A":{"color":{"A":"#000000"},"leading":{"A":"1200"},"tracking":{"A":"46"},"font-size":{"A":"17.266071805807044"},"text-align":{"A":"start"},"font-family":{"A":"YACgEaSMfJc,0"},"text-transform":{"A":"uppercase"}}}]},"b":{},"d":"C","e":112.70434291041536,"f":20,"g":false,"h":"A"}],"B":735,"C":1102}](https://beautybrainsblush.com/wp-content/uploads/2019/09/How-to-take-better-makeup-photos-for-Instagram-written-by-a-beauty-blogger.-Beautybrainsblush.com-1-e1569006764320.jpg)
There may be affiliate links in this post. If you purchase through these links we may make a small commission at no cost to you. Please see our disclaimer, terms and privacy for more information.
There are thousands of makeup artists on Instagram, and even more makeup enthusiasts that are trying to gain a following by sharing their work on the social platform. Check out this list of tips and learn how to take better makeup photos for Instagram – with your phone!

One of the most important things you can do to ensure an Instagram-worthy makeup post is spending time on your makeup look and putting your best effort into it!
If you have an awesome look that you love, it will be easier to get the result you desire. If you have a look you don’t really like and isn’t super great, you won’t truly be satisfied with the outcome no matter how great your photography skills are.
Here are the other important parts of making your picture look perfect!
Lighting
If you don’t have the correct lighting to capture the detail and beauty of your makeup, your photo will suffer immensely. It’s at the top of the list because it is so incredibly important!
The best lighting you can have is medium-bright natural, indirect lighting. Let’s go over what this means.
Having a medium to high level of light will mean that it’s bright enough to lighten your entire face and show all the color and detail in your makeup. If you have dim or low light levels, you won’t be able to capture the gorgeous shimmer or the intensity of the color.
Natural lighting is the best lighting.
By natural light, we’re talking about the sun! Sunlight is balanced (not too warm or cool toned) and shows the color of makeup most accurately. If at all possible, taking photos using sunlight will make a huge difference in your picture.
Indirect lighting means that the sunlight isn’t shining right on your face, but is instead diffused and bounced across other surfaces. For instance, an ideal situation would be having lightweight blinds or curtains in front of your window, but sunlight still pours into the room through them and bounces off the walls and ceilings – creating a brightly lit room with no harsh sunbeams.
Why is indirect lighting better than direct lighting? A couple of reasons. Oftentimes direct sunlight is too bright, causing you to squint. Worse, it can damage your eyes if you try to look into the sun to illuminate your face. Additionally, harsh sunlight can cast unwanted shadows on your face, such as with your nose, eyelashes, or with other objects around you.
Here are a couple examples of direct lighting, which is not the best for photos (featuring a silly face because I didn’t think I’d use the picture in a post, ha!).

In contrast, here is a photo of the same makeup look with indirect lighting in the same room:

If you don’t have good sunlight available in your home, try taking photos outside. Standing under the shade (a tree, maybe?) in the afternoon gives you plenty of sunlight without the dreaded shadows of direct lighting.
Alternatively, the second best lighting you can use is a RINGLIGHT! You’ve probably seen these all over Instagram, Facebook, and YouTube – for good reason. Ringlights illuminate all sides of your face, which will prevent weird shadows on your makeup looks.
Check the Camera Settings
This article is written assuming that you are taking photos of makeup using a smartphone, but this is important for any camera you are using!
If you go into your phone’s settings, you can find your camera’s settings and check the stats.
I can see that my camera’s resolution can be changed – back camera, front camera, and different resolutions for video too!

Make sure your camera is set to the highest resolution capable. If it isn’t, switch it!
On some phones, such as iPhones, there are some on-screen settings available when you open your camera app, such as HDR. Look into all of the specific settings your phone has to make sure you’re using all the optimal capabilities!
Use the Back Camera
Typically, the back camera is capable of a higher camera resolution than the front, selfie camera.
This is usually because the lens is bigger in the back, or there are multiple to create the best image possible!

In my phone settings above, I can see that my back camera has a resolution of 12.2mp, while my front camera only has 8.0mp – that’s over a 50% increase! It’s a no brainer to use the better camera you have available to you.
I know what you’re thinking now – how can I take my own makeup photos using the back camera when I can’t see myself?
Try taking the picture in front of a mirror, like this, so you can see your own reflection in your phone screen. Win!

Are you still not convinced that using the back camera makes a difference?
Maybe this side by side comparison will convince you!

Neither of these photos are edited at ALL.
You can clearly see that the back camera’s photo is sharper, more focused, and the color is more vibrant.
Back camera > front camera.
Clean The Lens
I can’t tell you how many photos I took of my makeup, getting frustrated that they all turned out blurry or had a mark on them, before I realized that my camera lens was dirty or smudged.
Clean your camera lens before taking photos!
You can easily use a lens cleaner or glasses cleaner to make your camera lens spotless before you start snapping pics – and trust me, it makes a difference.
Coordinate Your Look
This isn’t really a rule, and it doesn’t apply if you’re taking close up shots of just your eye(s), but coordinating your makeup look to your outfit or background can help more than you think!
Simply wearing the same color shirt as your eyeshadow or lipstick can really pull the entire picture together, creating a better sense of cohesion.
Backgrounds can make a difference, too. A blank, light colored wall is your best bet – if you have good lighting by one!
Don’t think that everything always has to match perfectly – it absolutely doesn’t – but by keeping your outfit and surroundings more simple will help keep the focus of the photo on your makeup instead of what is around you.
Avoid busy surroundings and busy clothing patterns that will distract your viewer from what’s important… the makeup!!
Focus the Camera
Before you take your photo, tap your phone screen lightly where you wish to focus – your eye or your face, usually!
This will ensure that your camera is focused on you instead of a random flyaway strand of hair.
It’s also easier to take a clearer, more focused photo with the back camera. This goes back to the point above!
Take a Bunch
Don’t just take one photo and force it to work. Take multiple photos! Take dozens!
When I take photos of a makeup look, I often fill up a whole screen or two with photos in slightly different angles and lighting situations.
At the very least, take 10 photos to choose from.
Afterwards, simply go through the pictures and choose your favorite. Because they’re digital, you can just delete the ones you don’t want!
Edit (Within Reason)
A lot of people edit their photos. I edit mine!
But, there is definitely a line of “over-editing” your picture.
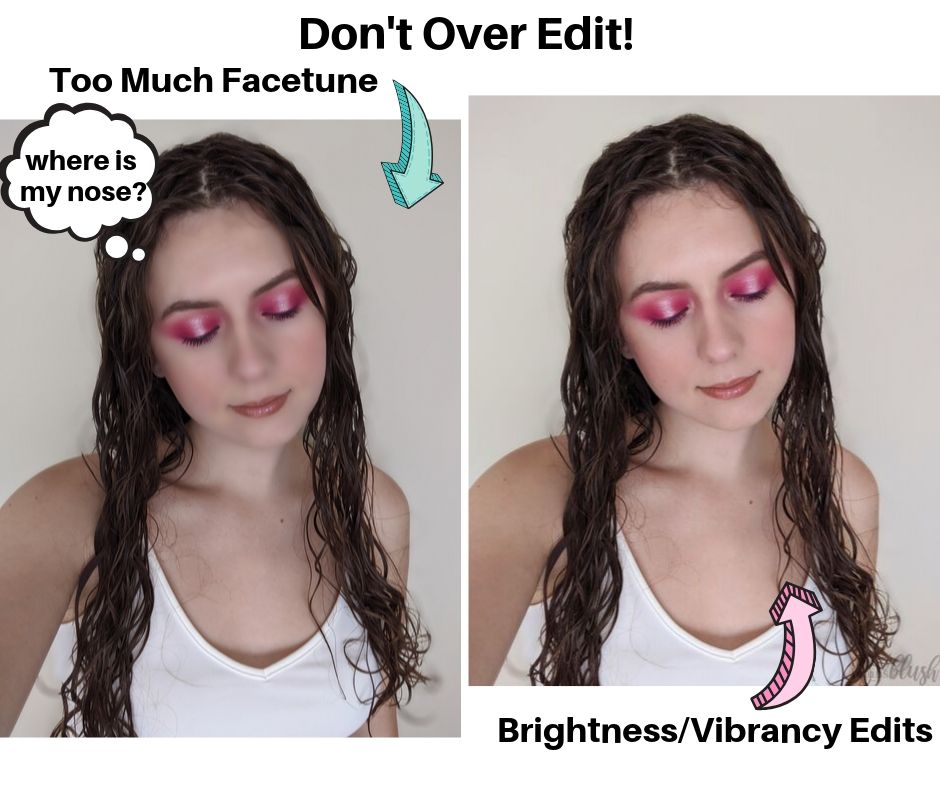
With applications like facetune and photoshop, you can easily smooth out your whole skin so it looks flat, patch all your blemishes, and change the whole color of your makeup look.
Here’s my advice:
Edit your photo as little as possible.
I personally edit the brightness, highlights and shadows, and vibrancy of my photo to make it a little bit brighter and amp up the colors a tiny bit – which makes them look true to life, since the camera always seems to dull them slightly. Sometimes, I edit out a blemish with a patch tool. I’ll add my watermark to the photo, too.
Here’s an example of an original photo and my edited version:

But for the love of skin, don’t smooth out your entire face! It looks extremely fake, blurry, and is never preferred over seeing REAL skin. If only your eyes and lips have texture, it looks super fake.
There was a period on Instagram where it seems that everyone had to smooth out their skin on every photo to seem “perfect” when in reality, we all have flaws and that is okay! A high quality photo that shows a couple flaws is better than a photo that has been blurred in parts to hide them (which will only draw attention to the area, so in the end, everyone knows you edited it).
Many artists, including me, have decided to NOT edit our makeup or skin on Instagram. We are only showing real looks and real skin – something that should be normal and praised instead of being expected to smooth out your photo to nothing. I think we should all be doing this and break the “Instagram perfect” image that no one can truly reach.
PIN THIS:

I hope these tips were helpful for you!
Posting makeup photos to Instagram is super fun. If you use these tips to take any images, please tag me @beautybrainsblush so I can see!





Leave A Comment