
There may be affiliate links in this post. If you purchase through these links we may make a small commission at no cost to you. Please see our disclaimer, terms and privacy for more information.
Over the past couple years, an eyeshadow technique called a “cut crease” has become extremely popular! Cut creases can be extremely simple and casual, or they can be detailed and extravagant. Here are our 7 best tips to get the perfect cut crease!

What is a cut crease?
Before we talk about how to get the perfect cut crease, I want to make sure you know exactly what you’re trying to achieve.
Straight from our makeup glossary, a “cut crease” is a style of eyeshadow where artists “cut” the eyeshadow color in a smooth, sharp line from the inner corner of the eye along the eye’s crease using concealer. This creates a large contrast between deeper shades in the crease and lighter shades on the eyelid.
Here’s an example!
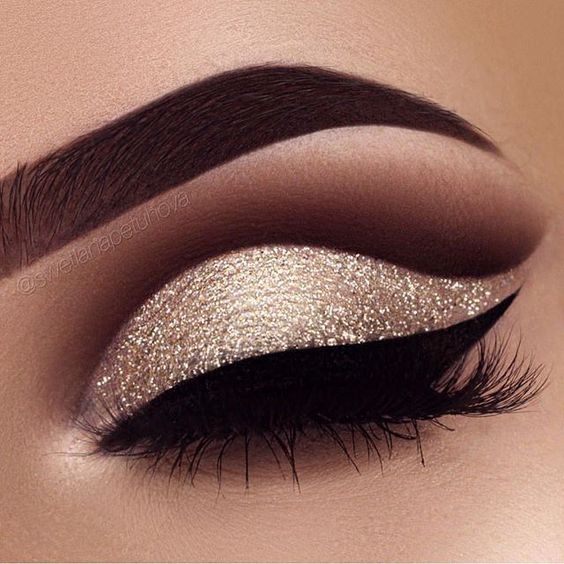
(Source and artist unknown)
Tips to Achieve the Perfect Cut Crease
1. Use a matte eyeshadow in your crease
Using matte shades around the area where you “cut” the crease will help it look more defined and sharp!
Matte eyeshadows are typically easier to blend out, allowing you to create a seamless and beautiful blend from your crease up towards your brow bone.
Shimmer shades typically shouldn’t be used in the crease area because they can be harder to blend out and can potentially have fallout throughout the day.
2. Don’t pack eyeshadow onto your lid before you “cut” it!
While you’re blending out the matte shades in your crease, it is normal to get a bit of eyeshadow on your eyelid! However, don’t purposely pack any shade on your lid before you “cut” the crease.
Why?
The more products you layer on your eyelid, the more likely it is that it won’t look perfect.
Prime your eyes before you start, add in a few matte shades in your crease and lid, then cover with a concealer AND another shade – you’ll quickly have a few thick layers on your eyelid that can feel heavy and sloppy.
If you get a lot of eyeshadow on your eyelid, I recommend grabbing a cotton swab with a little bit of micellar water and wiping it off – allowing you to start with a fresh canvas to cut the crease.
3. Use a full coverage concealer to “cut” the crease
Full coverage concealers will cover any pigmentation on your eyelids, and even a bit of eyeshadow if needed.
The formula of full coverage concealers are thicker than foundations and eye primers – which will allow you to get a sharp crease that doesn’t feather.
Many people like to use a very light or white concealer for cut creases! This helps the lid shade show its true color. If you used a medium skin tone concealer and tried to put a blue shimmer on top, it would look more dull than it would if you used a light or white colored concealer as it’s base.
My favorite budget friendly concealer for cut creases is the e.l.f. Cosmetics 16HR Camo Concealer for $5 – it’s extremely full coverage and works as an awesome eyeshadow base.
4. Brushes > Doe foot applicators
Using the concealer’s doe foot applicator to cut your crease is not a good idea.
Why?
- You will use way too much product if you apply straight from the tube
- The line will be messy, not precise
- You risk picking up eyeshadow pigment onto your doe foot applicator and putting it into your concealer
Instead, I recommend using a small, precise brush to apply the concealer to your eyelid. Using a small brush will allow you to control how much product you’re using and where you are placing it.
I love using small, flat brushes for cut creases. Do not use a fluffy brush; it won’t be precise! A tiny concealer brush or even a lip brush is best for this purpose.
5. Stamp on the concealer first
When you first try to cut your crease, you may be tempted to take your concealer-loaded brush and swipe it onto your eyelid to create the cut crease line in a single motion.
While this can work, it can take a lot of practice to get the single-swipe motion down!
Instead, try stamping the product into place. Lightly tap your brush on your eyelid along the crease to evenly distribute the product where you want it. It doesn’t have to be absolutely perfect when you stamp the concealer down.
After you have a general shape, you can get a bit more concealer on your brush and drag it along the curved crease line to sharpen it up!
6. Add some shimmer
Using a shimmer or glitter on the eyelid will help your cut crease really pop! The difference in textures between the matte shades in your crease and the light-reflecting shimmer on the lid will add a sense of glam to the look.
Of course, you don’t have to add any shimmer – all matte cut creases are gorgeous, too! But if you are having a hard time making your cut crease look the way you want it to, using a shimmer might help.
7. Deepen the crease
If your cut crease doesn’t stand out as much as you want it to, try deepening your crease a bit more!
After you cut your crease, take a detail brush (eyeliner brushes work great for this!) with the deepest shade you used in your crease, and carefully place it along the top edge of the cut crease. This will create more dimension and help your crease really pop.
This tip can also help you clean up any concealer that may have feathered or smudged when you were cutting the crease!
Pin this for later:

I hope that these 7 tips for a perfect cut crease were helpful for you!
Do you have any other tips to help us all achieve a perfect cut crease? Did these tips work for you? Comment below and I’ll get back with you!


Great advice! Cut creases definitely take practice!
YES! They totally do!! It took me a while to get it down, and now I can do one pretty easily. Practice, practice, practice!!
This was really really helpful 💕